Looking to set up your studio lighting without a ton of clutter? Minimalist ceiling track lights are an excellent answer. They give you a flexible, powerful lighting solution that keeps your space looking clean and professional, all while being incredibly practical. This approach moves beyond the typical bulky stands and tangled cords, offering an integrated system that can transform not just how your studio looks, but how efficiently you work.
Why Minimalism Works for Studio Lighting
When we talk about “minimalist” in the context of studio lighting, it doesn’t mean sacrificing capability. Instead, it’s about smart design and efficient use of space. Think about it: fewer stands to trip over, less cable management hassle, and a cleaner aesthetic that can actually improve your creative flow.
Beyond Just Aesthetics
While a clean look is certainly a bonus, the real power of minimalist lighting Hongfu lies in its functionality. It frees up valuable floor space, which is often at a premium in home studios or even smaller commercial setups. This makes your studio more versatile, allowing you to quickly reconfigure for different shoots or activities without moving heavy equipment around.
The Appeal of Ceiling Tracks
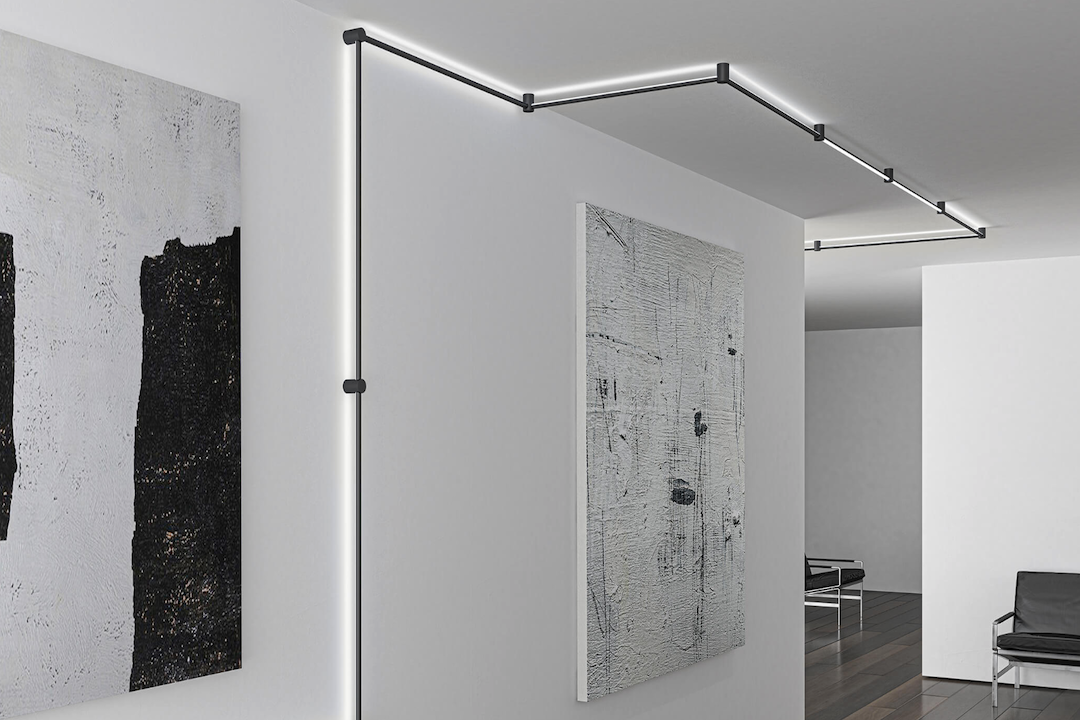
Track lighting, by its nature, is a minimalist dream. The tracks themselves are unobtrusive, sitting flush or nearly flush with the ceiling. The light fixtures then attach to these tracks, providing a clean appearance that doesn’t scream “studio equipment.” This integrated design is a huge step up from the typical array of C-stands and light modifiers that can quickly make a space feel cramped and disorganized.
The Core Components of a Ceiling Track Light System
Understanding what goes into a track light system is key to choosing the right setup for your studio. It’s pretty straightforward once you break it down.
The Track Itself
This is the backbone of your system. Tracks come in various lengths and can be cut to size or joined together to create longer runs or different shapes (L-shapes, U-shapes, grids).
- Single Circuit vs. Multi-Circuit: Single circuit tracks mean all lights on that track are controlled as one. Multi-circuit tracks (usually two or three circuits) allow you to control different groups of lights independently on the same track, which is incredibly useful for varying light setups.
- Voltage: Most common are line voltage (120V in North America) and low voltage (12V or 24V). Line voltage systems offer more power for brighter lights and generally simpler installation, while low voltage often allows for smaller fixtures and dimmer options. For a studio, line voltage is usually the more practical choice for power and light output.
- Mounting Options: Tracks can be surface-mounted directly to the ceiling, recessed into the ceiling for an even cleaner look, or suspended using rods for higher ceilings or a more industrial aesthetic. Surface-mounted is often the easiest and most practical for home studios.
Track Heads (Fixtures)
These are the actual light sources that attach to the track. This is where your choice in lighting technology really comes into play.
- LED Fixtures: For studio work, LED is the clear winner. They’re energy-efficient, produce very little heat (crucial for long shoots and comfort), have long lifespans, and offer excellent color rendition. Look for fixtures with high CRI (Color Rendering Index) – 90+ is ideal for accurate color.
- Adjustability: A good track head will offer both horizontal rotation (swivel) and vertical tilt, allowing you to precisely aim your light. This flexibility is what makes track lighting so powerful for studio environments.
- Beam Angle Options: Some track heads come with adjustable beam angles, or you can swap out lenses to go from a narrow spot to a wide flood. This versatility helps sculpt your light.
- Dimming Capabilities: Ensure your chosen track heads are dimmable, and that they are compatible with the dimmer switch you plan to use. Smooth dimming capability is essential for fine-tuning your exposure and creating different moods.
Accessories and Connectors
These allow you to customize your track layout and add functionality.
- Connectors: Straight connectors link two track sections, L-connectors form corners, T-connectors split a track into three directions, and X-connectors create a four-way intersection.
- End Caps: These cover the open ends of the track for safety and a finished look.
- Power Feeds: These are the points where electrical power is supplied to the track. They can be end feeds or canopy feeds (which connect to a junction box in the middle of a run).
- Dimmers: Integral to controlling your lights. Ensure they are compatible with your chosen LED fixtures (many LED fixtures require specific LED-compatible dimmers to avoid flicker or hum).
Designing Your Studio Layout with Track Lights
Thoughtful planning is crucial to maximizing the benefits of a track light system. Don’t just slap lights up; think about how you’ll use your space.
Map Out Your Workflow
Before you buy anything, consider the types of shoots you’ll be doing.
- Portrait Photography: Where will your subject generally stand? What kind of background will you use? You’ll likely want lights pointing towards the subject from various angles, and perhaps one for the background.
- Product Photography: Will you have a dedicated table or sweep? You’ll need even, diffuse light, often from multiple directions.
- Video Recording: Steady, consistent lighting is key here. Consider backlighting, key lighting, and fill lighting positions.
- Versatility: How often will you reconfigure your setup? Track lighting excels here because you can slide your lights to new positions in seconds.
The Grid Approach
For ultimate flexibility, consider a grid layout. This means running tracks in a crisscross pattern across your ceiling. This allows you to position lights virtually anywhere within the grid, offering unparalleled versatility.
- Single Line vs. Multiple Lines: Even if a full grid isn’t feasible, strategically placed parallel tracks can offer great flexibility. Two tracks running parallel to your main shooting axis, for example, allow for key and fill lights on either side.
- Spacing Considerations: Think about the reach of your lights. If you have a wide studio, you might need more tracks or more powerful fixtures.
- Powering Your Grid: A more complex grid might require multiple power feeds to ensure even power distribution and to accommodate multi-circuit control.
Light Placement Strategies
This is where the magic happens. Track lighting allows you to implement classic lighting strategies with ease.
- Key Light: Your main light source, usually positioned off-axis to create shape and dimension. With track lighting, you can easily slide it left or right, or adjust its angle.
- Fill Light: Softens shadows created by the key light. Simply add another track head, perhaps with a diffuser, and slide it to the desired position.
- Backlight/Hair Light: Separates your subject from the background, adding depth. A light positioned behind and above the subject is easy to achieve with a track head.
- Background Light: Illuminates your background to create a specific mood or to avoid harsh shadows.
- Modifiers: While not directly part of the track system itself, track lighting benefits from the use of compact modifiers. Small softboxes, barn doors, snoots, and grids can often be directly attached to or easily positioned near track heads.
Choosing the Right Lighting Technology for Studio Use
Don’t just pick any LED. For studio work, specific features matter greatly.
Color Temperature (CCT)
This refers to the “warmth” or “coolness” of the light, measured in Kelvin (K).
- Daylight Balanced (5000K-5600K): This is the standard for most studio photography and videography, aiming to match natural daylight. It provides a neutral base for color grading. Many track heads come with fixed CCT at this range.
- Bi-Color: Some advanced track heads offer adjustable color temperature, allowing you to dial in anything from warm (around 2700K-3200K) to cool (5600K+). This is incredibly versatile for matching existing light sources or setting specific moods.
Color Rendering Index (CRI)
CRI measures how accurately a light source reveals the true colors of an object compared to natural light.
- High CRI is paramount: For studio work, you absolutely need a CRI of 90 or higher, with 95+ being ideal. Low CRI can make colors look dull, washed out, or even distorted, making post-production a nightmare.
- TLCI (Television Lighting Consistency Index): For video work, TLCI is often a better metric than CRI, as it’s specifically designed for camera sensors. Aim for TLCI 90+ if possible.
Lux/Lumen Output and Power
More light isn’t always better, but having enough power is crucial.
- Lumens: A measure of the total light output.
- Lux: A measure of illuminance over a specific area (lumens per square meter). This is more relevant as it tells you how bright the light will be on your subject.
- Wattage: While not a perfect indicator of brightness for LEDs (as efficiency varies), higher wattage generally means more powerful fixtures.
- The Inverse Square Law: Remember that light intensity decreases rapidly with distance. If your ceilings are high or your subjects are far, you’ll need more powerful lights or lights with tighter beam angles to compensate.
Dimming Quality
This goes beyond just being “dimmable.”
- Smooth Dimming: Good quality LED drivers will allow for smooth dimming from 100% down to 1% or even lower without flicker, steps, or color shifts.
- Flicker-Free: Critical for video. Cheap LED lights can flicker at certain dimming levels or frame rates, ruining your footage. Look for lights advertised as “flicker-free” or “video-friendly.”
- Dimmer Compatibility: Always double-check that your track heads are compatible with your chosen dimmer switch. Mismatched components can lead to buzzing, flickering, or premature fixture failure.
Installation and Maintenance Tips
Getting your track system up and running efficiently.
Professional Installation or DIY?
- DIY if you’re comfortable: If you’re comfortable with basic electrical work (turning off switches, wiring simple fixtures), installing surface-mounted track lighting can be a DIY project. Start with a clear plan and follow instructions carefully.
- When to Call an Electrician: If you’re dealing with new wiring, moving junction boxes, or are simply not confident with electrical, always hire a licensed electrician. Safety first!
- Recessed Lighting: This is almost always a job for a professional as it involves cutting into your ceiling and potentially dealing with insulation.
Mounting Considerations
- Secure Fastening: Track sections need to be securely fastened to ceiling joists or robust anchors. You don’t want lights falling down.
- Electrical Code: Ensure your installation complies with local electrical codes.
- Power Access: Plan where your power feed will connect to an existing junction box.
Maintenance is Minimal, But Important
One of the beauties of LED track lighting is its low maintenance.
- Cleaning: Periodically wipe down tracks and fixtures to remove dust, which can accumulate and affect light output. Use a soft, dry cloth.
- Checking Connections: Occasionally, ensure all track heads are firmly seated in the track.
- Bulb Replacement (if applicable): While many LED fixtures have integrated LEDs, some track heads use replaceable LED bulbs. When replacement is needed, ensure you get bulbs with matching color temperature, CRI, and wattage ratings.
- Troubleshooting: If a light isn’t working, first check the track head’s connection, then the dimmer, and finally the circuit breaker.
Expanding Your Minimalist Studio Without Clutter
The initial setup is just the beginning. Track lighting makes it incredibly easy to evolve your studio.
Adding More Lights
As your needs grow, simply slide new track heads onto the existing track system. As long as you don’t exceed the track’s maximum wattage, adding more lights is as simple as clicking them into place and perhaps sliding them to your desired position.
Integrating Smart Home Control
Many modern LED track lights and dimmers can integrate with smart home systems (like Philips Hue, Google Home, Amazon Alexa, or Apple HomeKit).
- Remote Control: Adjust brightness and sometimes color temperature from your phone or voice commands.
- Pre-set Scenes: Create lighting presets for different types of shoots (e.g., “Portrait setup,” “Product flat lay,” “Video interview”) and activate them with a single tap.
- Scheduling: While less critical for a studio, advanced control can offer further automation.
Diffusers and Grids
While you’re aiming for minimalism in the hardware, judicious use of light modifiers is still essential for shaping light.
- Clip-on Diffusers: Smaller diffusers that can attach directly to the front of a track head.
- Small Softboxes/Umbrellas: If you absolutely need a larger spread of soft light, consider small, lightweight softboxes or translucent umbrellas on compact stands that can be quickly set up and stowed away. The track light can act as your main light source, with a stand-mounted modifier providing fill or additional effect.
- Barn Doors and Snoots: These are often available as accessories for track heads, allowing you to precisely shape the light beam and control spill.
Going Wireless
Consider wirelessly controlled LED track heads or DMX-capable fixtures if you need very precise control over individual lights. This can streamline your workflow even further by eliminating the need to physically adjust each light. While often a more advanced setup, it’s worth considering for larger or more complex studios.
Minimalist ceiling track lighting for your studio isn’t just a trend; it’s a practical, powerful, and aesthetically pleasing solution that addresses many common studio challenges. By understanding its components, planning effectively, and choosing the right technology, you can create a highly efficient and inspiring workspace that allows your creative vision to shine, unhindered by clutter. It’s an investment that pays off not just in the quality of your work, but in the overall enjoyment and efficiency of your creative process.